
How to Start a Clothing Line: Your Complete Guide to Design, Sampling, Production & Packaging
Are you an aspiring fashion entrepreneur with a vision to create your own clothing line?
Whether you’re dreaming of a simple line of printed apparel or a full cut-and-sew collection, this comprehensive guide will walk you through the complex process of starting a clothing manufacturing business.
In this post, I’ve compiled the knowledge and experiences of dozens of industry experts, from successful crowdfunding campaigns and private label wholesalers to pattern makers and textile factories. Drawing on their insights, I’ll provide a step-by-step roadmap for launching your own clothing line, no matter your budget or level of involvement in sourcing and production.
In this post, I’ll delve into three common business models – print-on-demand, wholesale/private label, and custom cut & sew – and explore the pros and cons of each approach. You’ll learn the importance of choosing a niche, focusing on design and quality, and creating a strong brand identity that resonates with your target audience.
As you navigate the intricate world of clothing manufacturing, I’ll guide you through crucial steps in product development, such as creating tech packs, sourcing materials, and obtaining samples. We’ll also cover essential aspects of branding, packaging, and marketing, offering practical advice and resources to help you build a successful clothing brand from the ground up.
Whether you’re working with a shoestring budget of $100 or ready to invest upwards of $10,000, this guide will provide valuable insights and actionable steps to bring your fashion dreams to life.
So grab a notebook, get comfortable, and let’s embark on the exciting journey of starting your own clothing line!
There’s a lot involved when it comes to starting your own clothing line, so let’s jump into it.
How to Start a Clothing Line: Table of Contents
Deciding on Clothing Products You Want to Sell
You have a lot of choices when it comes to creating apparel and fashion products.
If you’ve always wanted to start a clothing line, you likely already have a good idea of the particular products you want to create and sell. For others, creating a clothing brand may represent a unique and interesting opportunity to design a product that represents your personal style—but you may be unsure of which products to sell.
Regardless of which category you fall into, it’s important to carefully consider all clothing and apparel options before deciding to move forward on one of them.
Some clothing and apparel products you may want to consider for your brand are:
Short-Sleeve Shirts
Long Sleeve Shirts
Hoodies
Pants/Leggings
Dresses
Lingerie/Underwear/Socks
Each of these clothing products presents their own opportunities and challenges when it comes to building a clothing brand around them, so it’s important to consider them carefully.
Keep this in mind as you continue through this article.
Below, we will look into some of the most common clothing line business models to get a better sense of the work, time, and monetary investment required for each.
Choosing a Clothing Line Business Model
If you’re ready to start your clothing brand, you’ll have some important choices to make at this point.
There are several directions you can take to create your own brand which are all pretty different from one another. And most importantly, the difficultly, costs, and time input vary dramatically between each option. Understanding the garment manufacturing process is crucial when selecting a business model, as it impacts production efficiency and scalability.
Let’s take a look at the most common options:
Print-on-Demand Clothing Line
Private Label Clothing Line
Custom Cut & Sew Clothing Line
Let’s dig into the advantages and disadvantages of each one below.
Type
Difficulty
Cost
Time
Print-On-Demand Clothing Line
Very Low
$
Very Low
Wholesale/Private Label Clothing Line
Low
$$
Medium
Custom Cut & Sew Clothing Line
High
$$$$
Very High
Factors to Consider When Selecting a Business Model
When selecting a business model for your clothing line, there are several factors to consider. These include the type of clothing you want to produce, the target market, the competition, and the resources available. It’s essential to choose a business model that aligns with your goals and objectives.
One of the primary factors to consider is the type of clothing you want to produce. If you’re looking to create high-end fashion, you may want to consider a custom cut and sew business model. This model allows for complete control over the design, materials, and construction of your garments, ensuring that each piece meets your exacting standards.
On the other hand, if you’re looking to produce casual wear, a print-on-demand or wholesale/private label business model may be more suitable. These models offer quicker turnaround times and lower upfront costs, making them ideal for trendy, fast-moving fashion items.
Another factor to consider is the target market. Who is your ideal customer? What are their needs and preferences? Understanding your target market will help you choose a business model that meets their demands. For instance, if your target market values unique, bespoke pieces, a custom cut and sew model might be the best fit. Conversely, if your audience is looking for affordable, everyday wear, a print-on-demand or wholesale model could be more appropriate.
The competition is also an essential factor to consider. Research your competitors and understand their business models. This will help you identify gaps in the market and create a unique selling proposition for your clothing line. For example, if the market and niche you’re looking to enter is saturated with mass-produced items, offering custom, high-quality garments could set you apart.
Finally, consider the resources available to you. Do you have the necessary funding, equipment, and personnel to support your chosen business model? Make sure you have a clear understanding of your resources and capabilities before selecting a business model. For instance, a custom cut and sew model requires significant investment in design, materials, and production, whereas a print-on-demand model requires less upfront capital and can be managed with fewer resources.
By carefully considering these factors, you can choose a business model that aligns with your vision and sets your clothing line up for success.
Let’s dig into each clothing business model a bit more.
Option #1: Print-on-Demand Clothing Line
The first and easiest option for starting your own clothing line involves printing your designs or logo on standard blank apparel.
This is an attractive option for people with a low budget (less than $1,000) and those wanting to benefit from being able to set up a nearly fully-automated business. The biggest drawback of this type of business model is the lower profit margins and the lack of ability to differentiate your product on things like material, stitching, and fit since you’re using standard wholesale clothing.
The print-on-demand or direct-to-garment printing process uses a special digital ink-jet printer to print ink directly onto clothing and apparel. These digital printers are able to produce full-color images on clothing items with extreme accuracy.
Print-on-demand printing produces high-quality printed apparel quickly and efficiently. Because of this, there are no setup costs, unlike screen printing. This means that it’s easy and cost-effective to print small orders (including just 1 unit).
Pros
No set-up costs
High-quality prints
Unlimited color options
Perfect for low order quantities or one-offs
Many clothing options (shirts, leggings, socks, dresses, etc.)
Cons
Not cost-effective for large production runs
Generally no volume discounts
Limited print product selection
Limited finishing options (tags, labels, etc)
Timeline: Days
Costs: $0-$500
Time & Energy Input: Very Low
Other Notes: To start a print-on-demand clothing brand, we recommend using Printful and Shopify. When utilizing a clothing and apparel printing company like Printful (which seamlessly integrates with Shopify stores), you can be up and running in a matter of hours for under $50. Once you receive an order for your online store, Printful will also receive the order automatically and begin the printing process and ship it to your customer on your behalf.
Read more about this process and learn how to set up a business like this step-by-step in my article on how to start a t-shirt business in under 24 hours.
To find more print-on-demand clothing suppliers, check out Dropshipping Suppliers Directory.
Option #2: Wholesale/Private Label Clothing Line
When sourcing clothing products through wholesale or private label suppliers, you are essentially purchasing clothing products from other brands and then selling them to customers from your own store. When you source clothing products this way, you’ll purchase pieces in bulk from a supplier at a discounted price, and then sell the items to your customers at a markup. This was another business model I have utilized previously for another ecommerce store in which I sold a wide variety of high end, stylized socks from brands like Bugatchi, Happy Socks, and Corgi.
With this option, you won’t be manufacturing your own clothing items from scratch, but you’ll be curating a selection of pieces that suit your customers’ tastes. You won’t be able to customize each clothing piece like you would if you were manufacturing clothing items, but you also don’t have to go through the lengthy and expensive process of having your own clothing items manufactured. The main disadvantage with this option, however, is that you have to purchase many stock-keeping units (SKUs) of clothing items in bulk and upfront, which means you’ll need cash flow.
Pros
Don’t need to manufacture your own items
Can keep up with changing trends more easily
Get to curate your own range of products
Volume discounts
Potential for good profit margins
You can brand items with your own hangtags, packaging, etc.
When working with a private label supplier, you will be able to customize the clothing tags with your own brand name
Cons
When working with a wholesaler, you won’t be able to customize the clothing tags with your brand name
Usually, minimum order quantities start at (at least) 10 units per color/size, if not 100 or 1,000 units – this will depend on the brand and type of clothing
You’ll have to manage inventory and shipping yourself
You’ll need cash flow to purchase many products upfront
Not all clothing manufacturers will offer this as an option
Option #3: Custom Cut & Sew Clothing Line
Custom cut and sew clothing means you’re doing everything. We’re talking about designing sketches, turning them into patterns, sourcing fabrics and manufacturers, and paying for a full production run (which could be thousands of units).
Making your own clothing isn’t for the faint of heart. It can be an intensive process that can take months (at minimum) to get up and running. You’ll need to find a manufacturer, you’ll need to work with a pattern maker, you’ll have to create tach packs, you’ll have to source and test fabric, and you’ll also likely have to create and test many samples before you even come close to a finished product.
Depending on the exact clothing items you’re looking to produce, just to get a few samples as finished products can cost thousands.
Once you have a finished product, you’ll also need to produce a full run with your manufacturer, you’ll need to stock your inventory, and even develop a shipping strategy to get your clothes to your customers.
Prior to starting my wholesaling sock business stated in the previous section, I had a previous business in which we did just this. Creating out own sock designs, working with a designers, and a local manufacturer. Unfortunately this business ran its course when the local manufacturer (one of the last sock manufacturers in Canada) was sold to another company and we had to discontinue the relationship.
Pros
You’ll get a 100% custom product
Potential for increased perceived value from customers
Potential for increased margins
You’ll be 100% in control of branding
Cons
Very high startup costs
It’s a complex process involving several moving parts
It can take months or more to launch
Timeline: 3 months – 1+ years
Costs: $10,000+
Time & Energy Input: Very High
Other Notes: The second part of this post will focus on all the steps and resources involved in developing your own cut and sew clothing line so read on!
The Elements of a Successful Clothing Brand
Great clothing brands are great for a reason. Usually, they do one thing very well, and sometimes they do multiple things really well. Before starting your own clothing line, there are four important factors to a successful brand that you’ll want to consider:
Niche
Design
Quality
Brand
Let’s dive into each one of these elements a little more below:
Selecting a Clothing Brand Niche
Selecting a specific niche is important—and many times, vital—for success in the clothing and apparel industry. Blindly trying to target large groups of people will leave you with a brand that speaks to no one.
Focusing on a specific group of people has several major benefits:
It’s easier to market (since you can hone in on your target market more specifically)
It can be more affordable (since you aren’t targeting the wrong audiences)
There’s potential for less competition (the more you niche down, the smaller your competitive pool gets)
You can attract greater customer loyalty (because your audience knows that you’re focused on them)
For example: “Clothing with funny slogans” or “hoodies for men” are both too broad to attack since the markets are very developed. Niching down will help you better target your market, allow you to reach them more easily, and be able to create more value for them. So instead of “clothing with funny slogans” you might cater to a specific and passionate market like “clothing with slogans for nurses or firefighters.” Or, instead of “hoodies for men” you could focus on manufacturing ultra-thick/warm hoodies for people in cold climates.
Clothing Designs
Your designs—whether they’re printed, embroidered, or the design of the actual garment itself—are critical. Not only do your clothing pieces need to look great, but they also need to look great specifically in the eyes of your target market.
Ultimately, you’ll be the one who loses if your clothing designs aren’t aesthetically pleasing and appealing to your buyers. Your designs don’t necessarily need to be complex—in fact, many of the best-selling clothing designs are very simple—however, they do need to connect with your specific audience/niche.
Clothing Quality
You can fool someone once, but you can’t fool them twice. A pattern that fades and cracks over time or a piece that comes apart at the seams after one wash won’t create raving fans that’ll come back and repurchase.
Not all clothing is the same, there can be huge variances in the quality of clothing items. The quality and composition of the materials you choose will affect how the clothing wears, how it washes, how it fades, shrinks, and ultimately how long it lasts. As we mentioned above, quality is paramount to your brand and its success, so it’s important to educate yourself and choose your materials carefully.
It will always be tempting to sacrifice quality for higher profit margins but you need to consider how the quality will affect customer’s decisions to share your brand with others and repurchase in the long run.
Clothing Brand
Many clothing companies are built on a strong brand. Beyond the clothes themselves, a strong brand encourages and reinforces your target market to purchase, represent, share, and repurchase your clothing pieces. Your brand extends way beyond the product itself and encompasses what the brand stands for and the lifestyle associated with it.
Differentiating Your Clothing Line
The clothing design and apparel industries are some of the most saturated industries to be in. In order to effectively compete, you’ll need to have a point of differentiation that sets you apart in the market from all the rest.
Working out of a factory has also given me an upfront view of how many people get into this industry with absolutely no clue what it’s going to take to build a brand that is even remotely successful. Blaming ignorance isn’t entirely fair… We had absolutely no clue how hard it would be either. However, we started Stock with a clear reason of what differentiated us, why people would be interested in buying our stuff, and how we would go about selling. This is a step that I see a lot of aspiring makers skip.
– Jim Snediker | Stock Mfg. Co.
The good news is that there are multiple ways to set yourself apart from the crowd…
If you plan to have graphics or images on your clothing pieces, the designs (the style of designs and quality of designs) can help set you apart from others.
Example: Blackmilk Clothing made their name known and became one of Shopify’s largest merchants by creating uniquely designed leggings, while also partnering with major brands, in the case below, Dr. Who:

Fit/Style
If you plan to create your own clothing from the ground up, the actual fit and style of the clothes can be an important point of differentiation.
Example: Perhaps the original online brand that became famous and known for a better fit is Bonobos. Bonobos decided that they wanted to create a better-fitting men’s pant. Their better fit helped establish them early on and turned their brand into a 100 million dollar company.

Brand
With all else being the same, people are more likely to buy from a brand whose story they can relate to most. Furthermore, a strong brand alone that connects with consumers can allow you to demand a higher price point, even if the quality is relatively the same as other common or less expensive brands.
Example: Billionaire Boys Club throughout the early 2000s sold t-shirts for nearly $100 that simply said “Billionaire Boys Club.” Although arguably, their t-shirts were the same quality as hundreds of others on the market, consumers bought into the young, urban brand and its story.

Niche
The niche you choose to operate in and your target market (if defined well enough and if it’s under-served) can be in itself a point of differentiation.
Example: See Ya Never is a clothing live that targets digital nomads that work remotely and travel the world. Even with thousands of clothing brands on the market, there are very few, if any, targeting this particular group of people.
80s Tees sells exclusive designs from 80s movies and TV shows. Not only are the designs appealing and nostalgic, but many of the designs are licensed making them exclusive and nearly impossible to find elsewhere.
Finally, Canada Threads focuses on clothing and accessories that uniquely resonate with Canadians, including designs related to the beloved Canadian House Hippo.

Performance/Material/Quality
The type of material plays a part in differentiating your clothing pieces from the rest out there. How they perform for the wearer (are they comfortable, itchy, restricting, warm, light, airy, do they wrinkly easily, etc.) and their overall quality (including any seams, buttons, the weight of the fabric, etc.) will all play a role in your customer’s satisfaction.
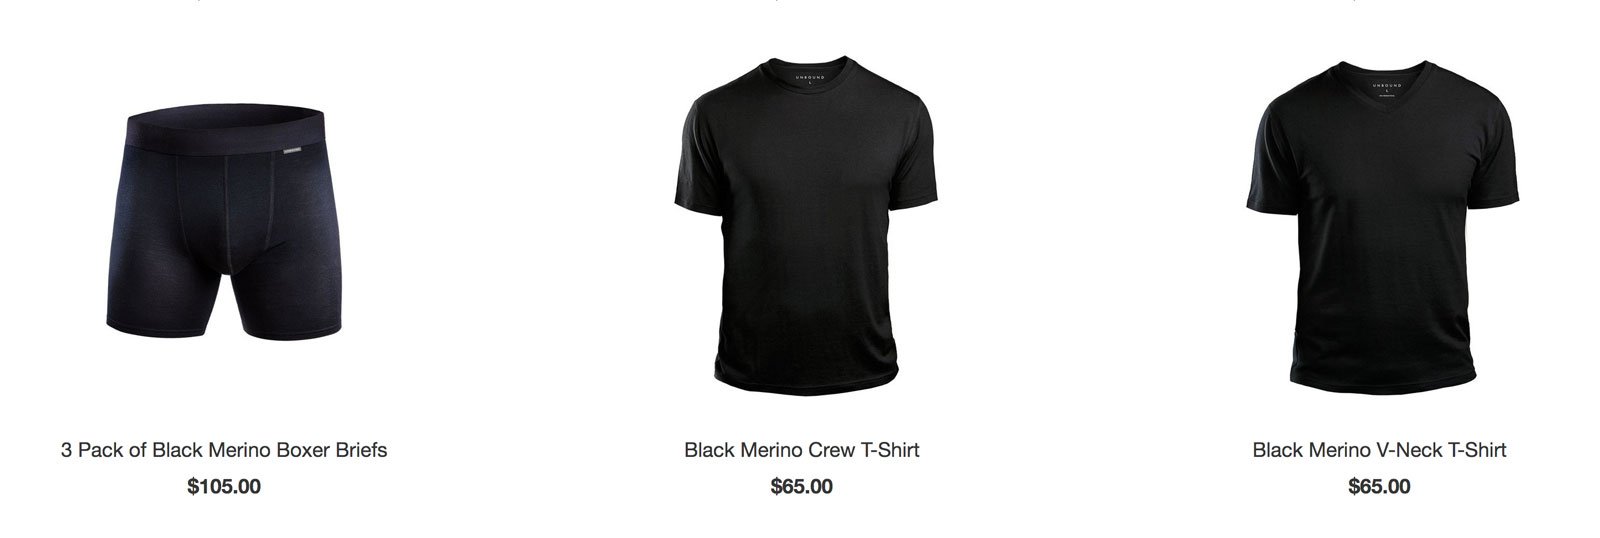
Example: Unbound Merino ran a successful crowdfunding campaign raising $300,000 and are building their brand based on the performance of their clothing: Casual wear made from 100% super-soft merino wool which has superior breathability and odor-blocking abilities, allowing this line of travel clothes to be worn many times without washing.
Developing a Business Plan for Your Clothing Line
With some of the basics out of the way, the next step is for you to develop a basic (but critical) business plan to map out your decisions and the direction for your clothing company.
Some of the major elements you’ll want to consider when putting together your ecommerce business plan are:
Your Business Model
Customer Personas
Competitor Strengths & Weaknesses
Costs & Margins
Crafting a Brand for Your Clothing Line
The next step is to develop a brand for your new clothing company.
Crafting a brand for your new clothing company is paramount. With so many clothing companies and brands out there, you’ll need to differentiate yourself. Your brand will be a big part of that.
Ultimately, every business has a brand and every new business will have a brand. Crafting your brand upfront gives you the chance to better define and communicate your message and story.
If you’re planning on creating a custom cut and sew clothing line, you may want to consider hiring a dedicated branding agency to help you craft your brand. If you’re planning on a print-on-demand or a private label brand where your investment and budget are much smaller, developing your own brand can be a worthwhile and low-cost option.
At this stage you need to identify:
Who your market is
What brand would speak best to this market
Below, we will quickly introduce you to several key elements of developing your clothing company brand, however, for a complete breakdown of all brand elements, as well as the guide and worksheets to define all your brand elements, check out our branding guide, A Better Brand.
Defining Your Market
Defining your market is important for any brand, but especially for brands in the clothing and apparel market because it’s extremely saturated. By broadly targeting large groups of people, you’re setting yourself up for failure right from the beginning. What you want to do is niche down and create segments.
Some critical questions to ask yourself at this stage is:
What type of clothing and apparel products do I want to make?
Who is going to purchase my products?
What specific value will my product or brand bring these people?
What will be unique about my product?
Who is my competition?
Creating Your Brand Pillars
Brand pillars are a few key words or attributes (usually 3-4) that embody what your brand is about, and they serve as a starting point for developing your brand persona. Later, these words are used as a checkpoint against most activities of the brand. For example, when creating your website, an advertisement, or even a conversation with your customer, you should check it against your brand pillars.
Ask yourself: Does my design/website/ad/conversation represent the essence behind my brand pillar words?
Your brand pillars act as a simple tool for keeping your brand consistent throughout all of your activities and they serve as the foundation for your brand.
Develop Your Brand Visuals
Your brand visuals are the common brand elements that many people immediately think about when they think about a particular brand. This includes your company’s logo, brand colors, and fonts, as well as your overall design and photography aesthetics.
Create a Moodboard: A mood board is a perfect way to start pulling together the visual style you’re going for. Essentially a mood board is a collection of images, photos, designs, colors, and any other snippets of multimedia you find from around the web that serves as an inspiration for your brand. While there are many tools available online to help you collect these elements, the easiest way tends to be using Pinterest or Instagram.
Select a Color Palette: Your next step in the branding process is to narrow down a color palette to use. Selecting a color palette up front will help keep your brand looking consistent through all channels. You’ll want to start by paying particular attention to the dominant colors used in your mood board since these are likely colors that immediately caught your eye. From there we also suggest you use a tool like Adobe Color to review other community-inspired and voted color palettes to get some additional ideas. Finally, Adobe also offers a tool for helping choose and refine your color palette, check it out here.
Craft a Logo: When it comes to crafting a logo for your business, you’ll want a logo that not only represents your brand well but one that speaks to your target demographic, too. While we always recommend working with a respected logo designer to craft the perfect logo for your brand, those with a smaller budget can get started for almost nothing with a tool like Looka.
Additional Resource: Check out my Ecommerce Branding Guide to help you develop all the critical components of your brand including your brand persona as well as all of your brand visuals like your moodboard, color palette, logo, and photography style. This guide includes a PDF ebook as well as worksheets to help you craft the perfect brand for your clothing line.
Note: At this point, we will continue on the path of talking about creating your own custom cut and sew clothing line.
If you’re planning on creating a print-on-demand clothing line, you can skip several sections and go to Creating Your Online Store.
If you’re planning to create a private label/wholesale clothing line, you can skip to Branding Your Clothing & Packaging.
The Product Development Process for Your Clothing Line
For anyone who is completely new to the fashion business, it’s important to know that this is a hugely important step in the process of starting and running a cut-and-sew clothing line. At this point, we strongly suggest that you consider partnering with a professional who knows what they’re doing and how to do it properly.
Professionals such as pattern makers, tech pack creators, design partners, materials partners, and production partners are highly experienced in their respective fields and it’s their job to make your clothing line a reality in the most efficient way possible. Without the help of professionals, things like pattern making and tech packs can be a nightmare for not only you but for the future manufacturer you plan to work with.
This is where researching your manufacturer in advance pays off for you, though. Some manufacturers offer professional product development services, some will only manufacture for you if they have done your product development themselves, and others don’t provide these services but they have partners who they prefer working with. All of this information will be outlined on the manufacturer’s website or by contacting them directly.
When it comes to the product development of your clothing line, there is generally going to be a common path to follow with some common terminology no matter what types of clothing products you’re developing. First, we will look at what the general process of clothing product development looks like, then we will discuss the process in more detail. Pre-production planning and quality checks are crucial in garment production to ensure efficient production and high-quality garments.
Designs: This generally refers to the initial design concept and is usually represented as sketches either on paper or digitally. While your patterns might start out as concept sketches, eventually you’ll likely turn them into digital sketches using a program like Illustrator.
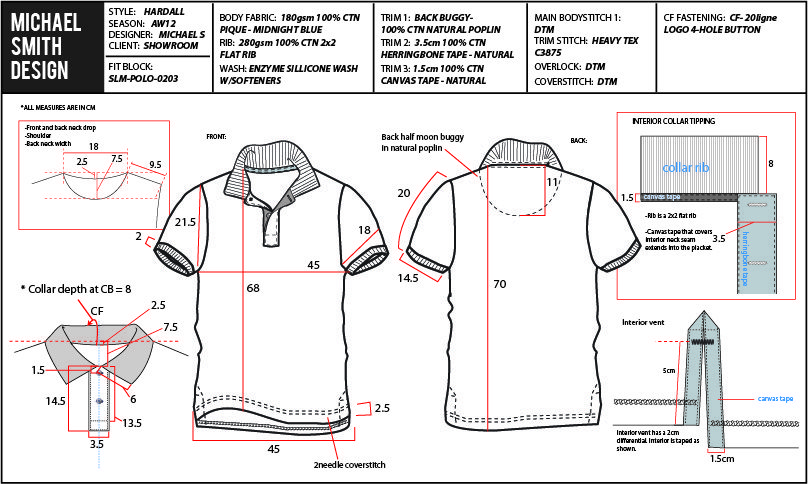
Tech Pack: A tech pack is essentially a blueprint for your apparel product, providing a manufacturer with all the details and technical specifications for production. This includes the designs, measurements, materials, and any accessories (zipper, buttons, etc.).
Pattern Making & Grading: Pattern making is the process of turning your technical drawings into patterns that can be used for production. Grading is the process of taking a single pattern and grading the pattern up or down to create the additional patterns for all the other sizes in your apparel line.
Sourcing: Sourcing involves finding, communicating, vetting, and working with multiple manufacturers to determine which one is best suited for the full production of your particular products.
Samples: This involves manufacturers producing a one-off or small batch of samples to provide you with a proof of concept, as well as for you to identify potential issues or improvements prior to a full production run.
Production: A full product run is the mass production of your apparel products. Depending on the products and the manufacturer, this can be hundreds of units, thousands of units, or even hundreds of thousands of units.
Below, we will go into greater detail about each of these steps in the process and provide you with more content and resources to get you started. However, it’s important to note that there are other resources available that will guide you through the full process, helping you at each step of the way.
Some of the most popular ones are:
Step 1: Design Your Clothing Line Concepts
Your clothing line will begin as sketches—most likely simple sketches in a notebook. This is usually the best route to get the ideas out of your head. As you begin sketching your clothing pieces, also think about adding any specific notes or unique ideas you have, as well as any special features or functionality. These notes will likely be part of tech packs later.
The initial goal is just to start developing your ideas and bring them to life.
Furthermore, the benefit of sketching out your ideas is that they can be shared. This is important because unless you’re a professional clothing designer, you’re going to likely need to enlist the help of a fashion designer or illustrator to help you pull together and refine your sketches into something more realistic and thought out.
Step 2: Create Patterns & Develop Tech Packs
You will need to enlist the help of a qualified pattern maker to take your idea and turn it into an actual pattern that can then be turned into an actual piece of clothing. A pattern can then be used to help create a tech pack.
A tech pack is essentially a blueprint for each garment. Your tech pack tells your manufacturer all the information required to transform your design into a final product. A proper and complete tech pack will reduce errors in production, save you money, prevent miscommunication, and ultimately, bring your product to life exactly how you envisioned it.
Your tech pack should include all possible details about your product, including (but not limited to) the:
Design
Fabrics
Measurements
Trim
Stitching
Artwork
Label & Tag Information
Packaging Instructions
Here’s an example of a tech pack for a better understanding:
(Source: Michael Smith Design)
Here are some pattern makers and technical designers who have been vetted and provided by Maker’s Row, to get you started:
Additional places to hire freelancers to help produce your tech packs:
Step 3: Research Clothing Manufacturers
The next step in this process is to research potential clothing manufacturers.
Find out things like their location, capabilities, heritage, reputation, and what other brands they’ve worked with to get an idea of what they can offer you. It’s important at this stage to really be thorough as small things such as location can have a massive impact on communication, turnaround time, and shipping when it actually comes to working with a manufacturer.
Not every manufacturer provides the same services so it’s important to know the pros and cons of as many manufacturers as possible so you can find the services you’re looking for without compromising on your brand values.
Maker’s Row: Maker’s Row has nearly 10,000 factories to explore, including over 3,000 in apparel, all based in the USA.
Sourcify: Sourcify has relationships with hundreds of Chinese manufacturers and will work with you to find and vet the right one for you.
Sqetch: Sqetch is similar to Maker’s Row but focuses on connecting you with European manufacturers.
Additional Resource: Check out my resource on finding clothing manufacturers to help get your search started.
Step 4: Determine Your Budget
Budgeting out product development and production costs is something you need to determine prior to selecting a factory to work with. You need to understand your budget availability and limits so you can map out all aspects of production, such as what fabric you’ll be able to use and whether producing overseas or in your home country is your best option.
Costs to consider in your budget include:
The price of professional product development services such as pattern making, tech packs, design development, etc.
The cost of making samples (bearing in mind that more than one sample is usually made)
The cost of materials such as fabric, buttons, zippers, hardware, and any other pieces used in the construction of your garments
The cost of transportation between you and the factory for meetings/visiting the factory
The cost of labor (determine the difference in labor cost between your home country and overseas labor cost requirements)
The cost of shipping between you and the factory and the cost of shipping the necessary materials to the factory
The cost of production and actually creating the clothing items themselves
After considering these factors, you’ll be able to communicate your budget to your future manufacturer and find one that fits your requirements.
Pricing out all of these costs is also helpful in determining whether or not producing in an overseas factory is more realistic for your business—bearing in mind that while the cost of labor may be cheaper, the cost of shipping between you and the factory will increase; as will turn around time. Nonetheless, understanding the cost of product development and production helps you and your future manufacturer make the best choices for your business.
Step 5: Select Clothing Manufacturers
Once you’ve researched a bunch of different manufacturers and have an idea of what’s out there, make a shortlist of manufacturers who seem like they’ll be a good fit for your clothing brand.
Maybe there are some manufacturers who specialize in the kinds of clothing products you want to produce, maybe some operate out of your local area, maybe some have raving reviews from past or current clients, or maybe some fit into your budget range better than others. Whatever is important to you in a manufacturer, narrow down your shortlist to ones who seem like they check off some of your most important boxes.
Step 6: Contact Clothing Manufacturers
By now you should have been able to narrow down a long list of potential clothing manufacturers into a shorter list of manufacturers who meet your needs when it comes down to what you require in terms of professional services, which manufacturers are actually able to create your future garments, manufactures in an accessible location, or ones who meet your budget requirements.
Now is the time to contact your potential manufacturers, but that may be easier said than done. Response rates for manufacturers differ, but producing a well-thought-out initial email and having a tech pack can increase your chances of actually receiving a response back from potential manufactures.
Here are some general DOs and DON’Ts when it comes to contacting a manufacturer:
DON’T come across as a “tire-kicker.” If your interest in manufacturing doesn’t seem to be serious or genuine you may not get a response. Manufacturers don’t want to waste their own time working with people who aren’t serious when they could be working with people who actually want to build and grow their business.
DO be polite. You and your manufacturer will be working together in this process—they don’t solely work for you—so treat them with respect and be mindful of their requirements, services, and processes.
DO be clear. In the best interest of yourself and your future manufacturer, it’s best practice to be clear about what you’re looking for, the services you require, your timeline, etc. Be upfront about what you need and don’t leave any room for ambiguities in the event that it will create more confusion down the road.
DO follow up. It’s okay to follow up after your initial email to ensure the factory received and read the message, so be prepared to send up to three follow-up emails spaced apart by a week or so to prompt a response from a factory. This will make you seem eager and serious to the factory which, if you’re new to this process, is what you want.
DON’T give them too much information. Introduce your company, the products that you’re looking to create with them, what services you’re looking for, and ask what further information they need from you. Give them enough information to know your intentions and that you’re serious about the inquiry, but don’t overload them with your brand goals, material choices, and timelines yet.
Click here to learn more about how to construct the perfect initial contact email to clothing manufacturers that will get a response.
Step 7: Screen Potential Factories
If you’re lucky, by this step you’ll have received responses from some of the factories you’ve contacted and now it’s time to narrow down your search.
Even if you only received a response from one factory, it is still important to make sure it’s the right fit for you. At this step, you should communicate further with the factories and learn more about how they conduct business and the quality of their products. You should be looking to evaluate whether or not you will get along with them personally and professionally in order to gauge your potential for success as colleagues.
These are things to look out for:
How they prefer to communicate with their clients (by email, phone, or personal visits)
Ask for references from other clients (to get a first-hand evaluation of what they are like to work with)
Ask for samples of products they’ve made (to judge if the quality of their products is at the level you’re looking for)
Understand how they charge for samples, services, and what constitutes extra charges
Get a feel for their timeline and availability
Now is the time to learn more about the factory, see their workspace in action, and communicate further with the manufacturer. This stage will give you an initial glimpse of what it will be like to work with this factory in the long run so it’s important to identify your respective strengths and weaknesses now so you can reduce the possibility of headaches and potential miscommunications in the future.
This is also now the right time to let the manufacturer in on your brand goals, where you see your brand starting off, what you see your brand scaling to, and let them know how you want them involved in that process. All the time you spent defining your brand in the first step should be communicated to the manufacturer to see if they understand where your brand is going and if they can get excited for your brand, too.
Step 8: Get Samples Made
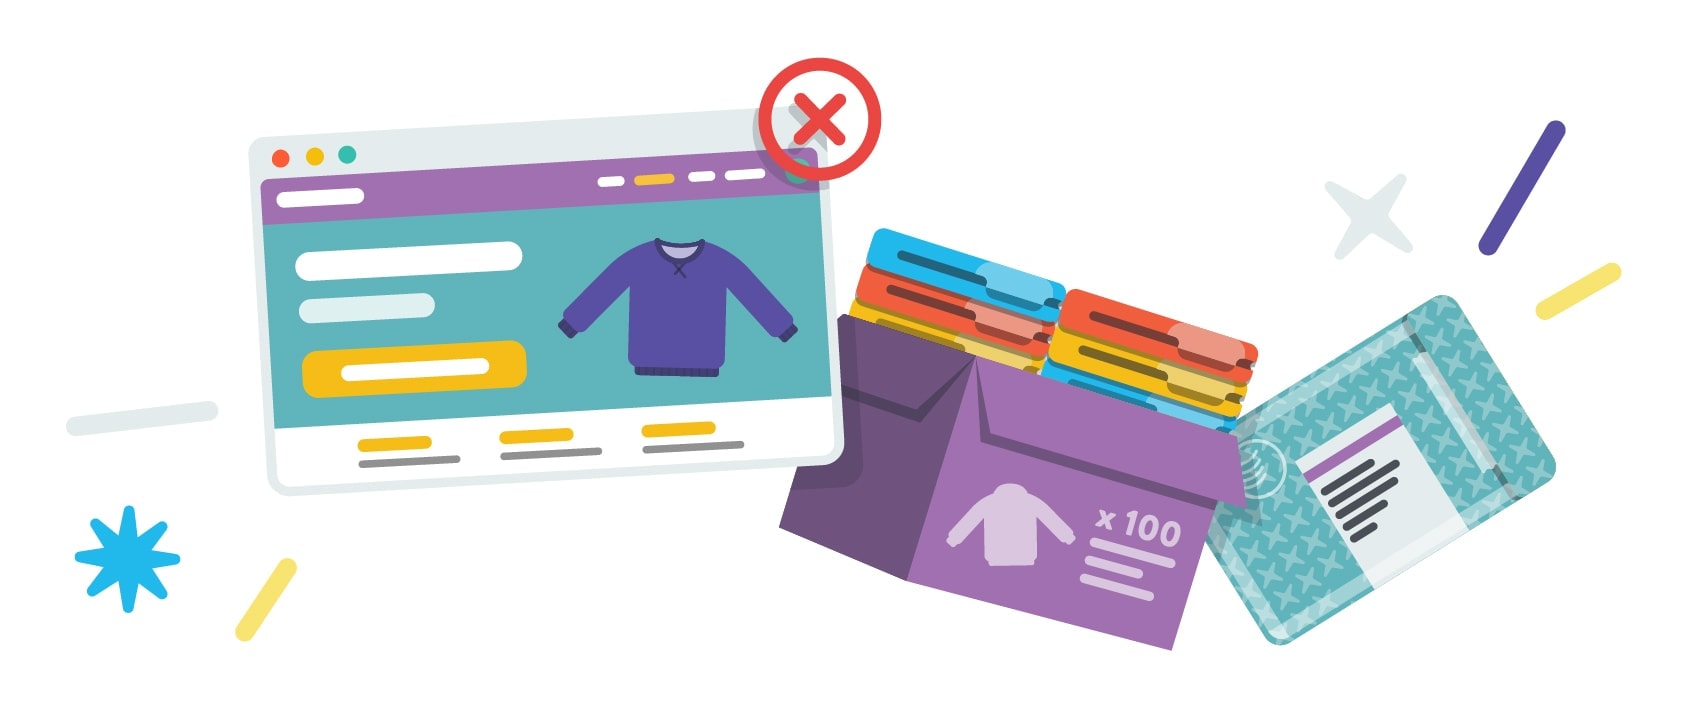
Now that you can see yourself manufacturing your clothing line with a factory or two, it’s time to get some samples made so you can truly experience what your potential product will be like.
No matter how well-designed your patterns and tech packs have been, there are always opportunities for adjustments and corrections so it’s strongly encouraged that the sampling step is never skipped. It can be easy to want to jump straight into production—especially when time and money are on the line—but in the end, a whole line of garments that don’t fit properly will cost you more than just having a few samples done right from the start.
At this stage, it is appropriate to have more than one factory make samples of your garments. Feel free to shop around so you’re absolutely sure the factory you pick will be producing the garments you want at the quality level you want!
Understanding the Importance of Sampling in the Production Process
Sampling is a critical step in the production process of clothing manufacturing. It involves creating a small batch of garments to test the design, fabric, and construction of the clothing. Sampling helps to identify any issues or defects in the production process, ensuring that the final product meets the desired quality standards.
There are several types of samples that can be created during the production process, including prototype samples, pre-production samples, and production samples. Each type of sample serves a specific purpose and helps to ensure that the final product meets the desired quality standards.
Prototype samples are used to test the design and functionality of the clothing. They are typically created using a small batch of fabric and are used to identify any issues with the design or construction of the garment. This stage allows designers to make necessary adjustments before moving on to more extensive production.
Pre-production samples are used to test the production process and ensure that the garment can be produced efficiently and effectively. They are typically created using a larger batch of fabric than prototype samples and are used to identify any issues with the production process. This step is crucial for ironing out any kinks in the manufacturing process and ensuring that the production line runs smoothly.
Production samples are used to test the final product and ensure that it meets the desired quality standards. They are typically created using a large batch of fabric and are used to identify any issues with the final product. This stage is the last checkpoint before full-scale production, ensuring that the garments are ready for the market.
Overall, sampling is an essential step in the production process of clothing manufacturing. It helps to ensure that the final product meets the desired quality standards and reduces the risk of defects or issues with the garment. By investing time and resources into thorough sampling, you can save yourself from costly mistakes and ensure that your clothing line maintains a high standard of quality.
Step 9: Start Full-Scale Production
The final step of the manufacturing process is really just the first step of building your own clothing brand.
This is the time to work with your manufacturer and get your garments produced! At this stage, it’s important to stay five steps ahead of everything:
Make sure deadlines are adhered to
Be available to answer any questions your manufacturer may have for you
Be diligent with quality control
Once production for one season of garments starts, the planning for the next season begins—this is only just the beginning! But now that you have the right manufacturer for your business, let their skills and services help you build your clothing brand to where you want it to be.
Garment Quality Assurance and Quality Control Measures
Garment quality assurance and quality control measures are essential in the clothing manufacturing process. They help to ensure that the final product meets the desired quality standards and reduces the risk of defects or issues with the garment.
There are several quality assurance and quality control measures that can be implemented during the production process, including:
Inspecting Raw Materials: This involves inspecting the fabric, threads, and other materials used in the production process to ensure that they meet the desired quality standards. Testing raw materials at this stage can prevent issues later in the production process.
Conducting Regular Quality Checks: This involves conducting regular checks on the production process to ensure that the garment is being produced to the desired quality standards. Regular inspections can catch defects early, allowing for timely corrections.
Implementing a Quality Control System: This involves implementing a system that ensures that the garment meets the desired quality standards. This can include implementing a system for tracking defects or issues with the garment. A robust quality control system can help maintain consistency and reliability in your products.
Providing Training to Employees: This involves providing training to employees on the importance of quality assurance and quality control. This can include training on how to inspect raw materials, conduct regular quality checks, and implement a quality control system. Well-trained employees are crucial for maintaining high standards throughout the manufacturing process.
Overall, garment quality assurance and quality control measures are essential in the clothing manufacturing process. They help to ensure that the final product meets the desired quality standards and reduces the risk of defects or issues with the garment. By prioritizing quality control, you can build a reputation for excellence and reliability in the clothing industry.
Step 10: Brand Your Clothing & Packaging
The branding of your clothing line has everything to do with how you’ll be perceived by your customers. Branding tells the story of your company and your packaging is one of the few parts of your brand—besides your clothing items themselves—that your customers will actually be able to touch, feel, and see. It engages your customers, it can make them feel valued, and it can even increase the perceived level of quality your customers associate with your brand and your clothing items.
This is why it’s important to seriously consider how you package and present your clothing items, no matter what items you’re selling.
There are plenty of different ways to enhance your brand’s packaging and presentation and to make it unique and true to your brand.
Let’s dive into your brand and clothing packaging.
Step 11: Branded Packaging Options
There are two different types of options when it comes to branding your packaging: The actual elements that you use for the packaging itself, and the additional extras you can include with the package to elevate the unboxing experience.
The package elements are the more functional items that are required to actually ship your clothing pieces, whereas the added extras enhance the experience and help to make your customers feel valued.
Elements of a Branded Package
These are the functional parts of a shipping package that you’ll need in order to ship your items from you to your customers. You won’t need every single one of these items, but they’re all options that you can use depending on what you want your packaging to achieve.
Shipping Boxes
Depending on the clothing items you sell, you may have to ship them to your customers in a shipping box. Shipping boxes are sturdy and are a good option for shipping heavy or bulky items (such as coats) or delicate items that need to be protected throughout the shipping process (such as beaded clothing pieces, or items with 3D appliqué).
Shipping boxes, however, can add weight and size to your package making it more expensive to ship, but if it will protect your clothing items while they’re on their way to your customers, it’s a small price to pay upfront that should decrease the potential of damaged items and returned products in the future.
Keep in mind that your shipping boxes don’t have to be boring cardboard boxes. There are plenty of services available to entrepreneurs and small businesses that can create custom boxes for your products at competitive prices, whether you’re looking for something sleek, simple, and plain or something colorful, bold, patterned, and vibrant.
You can also use these services to get your brand name printed onto the box itself for a more professional unboxing experience.
Where to Source Shipping Boxes:
Instabox (Canada)
Poly Mailers
Another great alternative for shipping clothing items is shipping bags—otherwise referred to in the industry as poly mailers.
These are an ideal option because unlike shipping boxes, they don’t add much weight or bulk to your package, so you won’t be adding extra shipping costs to your package. They are less sturdy than a box though, so they’re a good option if you’re shipping clothing pieces that aren’t easily damaged and can be bent and folded throughout the shipping process. They do come in plenty of sizes too, so whether you’re shipping one item or a few at a time, you should be able to source a selection of different sized poly mailers to meet your customer’s needs. Plenty of brands ship clothing items to their customers in poly mailers, so it is an appropriate method for the industry.
There are plenty of places online where you can get custom poly mailers made for your business so you’re able to add your logo, brand colors, or fun patterns to make it more exciting for your customers.
Where to Source Poly Mailers:
Bubble Mailers
If your clothing items need a bit more protection but you don’t want to completely upgrade from a poly mailer to a full-on shipping box, you have another option: Bubble mailers. As the name would suggest, they’re like poly mailers but they have a layer of bubble wrap included on the inside of the mailer which helps protect whatever’s inside.
They don’t offer the same sturdiness that shipping boxes do, but they help to cushion the contents of the mailer throughout the process and are less bulky than shipping boxes.
Where to Source Bubble Mailers:
Tissue Paper
If using packing peanuts and crinkle paper isn’t your style, or if your products don’t need additional protection, or even if you’re using a poly mailer, tissue paper may be an ideal option to enhance the unboxing experience for your customers.
Tissue paper makes the unboxing experience feel more like a gift, which can make your package seem thoughtful and your customers feel valued.
Tissue paper is also an easy way to add to your packaging without adding any extra bulk or weight, and you can have it printed with your logo or choose colored or patterned paper to add some extra flair to the package. Use an everchanging assortment of patterns, colors, and styles to keep repeat customers interested.
Where to Source Tissue Paper:
Packing Tape
Depending on your brand’s style, using packing tape that’s colorful, patterned, or printed with your logo may be an interesting way to decorate your shipping box or package. Not only is it decorative, but packing tape is functional and adds another layer of security to keep box openings sealed throughout the shipping process.
Where to Source Packing Tape:
Stickers
If you don’t need something as heavy-duty as pac